October 20, 2009

Apple Marzipan Tart

Labels: ,


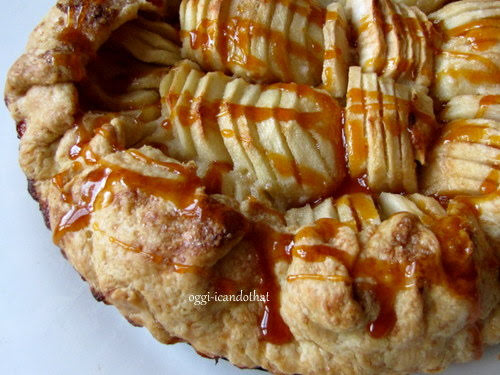
Fall means apples either for snacking or for making apple pies and tarts. For my first apple tart of the season I put a thin layer of marzipan on the bottom before adding the sliced apple halves. For extra crunch and sweetness I drizzled a little almond flavored caramelized sugar all over the baked tart. Very very yummy.

For this recipe, I suggest to use only sweet apples because there is very little sugar sprinkled on top. I used Honey Crisp, they're sweet and don't become soggy.

Apple Marzipan Tart
crust
1¾ cups pastry flour
1 teaspoon sugar
½ teaspoon salt
1 stick butter, diced and chilled
6 tablespoons ice water

filling
1 cup marzipan, homemade or store-bought
6 medium Honey Crisp or Fuji apples
2 tablespoons sugar
2 tablespoons coarse raw sugar
1 tablespoon butter, shaved

topping (optional)
2 tablespoons sugar
¼ teaspoon pure almond extract
  • Prepare crust: Put flour, sugar, and salt in a food processor, pulse to combine. Add the chilled butter and pulse for a few seconds. Add ice water 2 tablespoons at a time. Gather into a ball, wrap in plastic film, and refrigerate for 1 hour.
  • Preheat oven to 425°F.
  • Roll dough into a 14-inch round and ease into a tart pan with removable bottom. Press the dough gently onto the sides of the pan; there should be a 2-inch overhang.
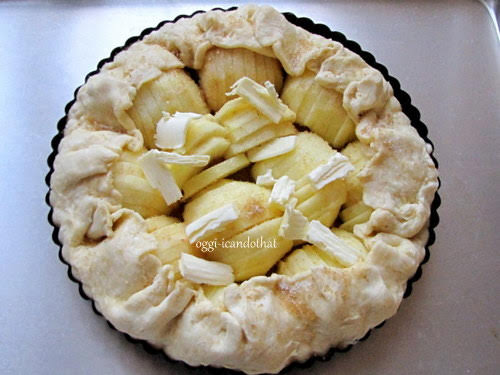
  • Flatten and roll the marzipan to fit the bottom of the pan and place on the crust.
  • Peel, halve, and core the apples. Slice the apple halves, leaving the slices in place and with a knife or offset spatula, transfer halves onto the marzipan, arranging to fit the pan. Dot with the shaved butter. Fold the crust overhang over the apples. Sprinkle all over with both sugars.
  • Place the tart on a sheet pan and bake for 1 hour and 15 minutes or until crust is golden brown. Remove tart from sheet pan and transfer to a wire rack. Let cool for 30 minutes before removing the sides of the pan.
  • For the caramel: In a small skillet, heat the sugar until melted and golden in color. Turn the heat off and stir in the almond extract. Immediately drizzle all over the apple tart.
If you have the patience to make it yourself, marzipan will cost just a fraction of the price of the ones from the store. You will need a food processor to make marzipan.

Marzipan
1 cup sugar
2 tablespoons light corn syrup
½ cup water
8 ounces blanched almonds
8 ounces icing sugar
1 tablespoon pure almond extract or rosewater
extra icing sugar
  • In a small pan, heat the sugar, light corn syrup, and water until sugar has dissolved. Boil until candy thermometer registers 235°F. Let cool slightly then transfer into a measuring cup.
  • Place the nuts and icing sugar into the bowl of a food processor and process until nuts are super fine. With the processor running, slowly add the syrup and almond extract until it gathers into a ball.
  • Dust work surface with icing sugar. Transfer almond paste on the work surface and knead, adding more icing sugar as needed, until smooth and pliable. Wrap in plastic film and refrigerate until needed.

homemade marzipan

October 19, 2009

Panettone: BBAC #24

Labels: ,

Panettone

One word to describe Panettone, The Bread Baker's Apprentice Challenge #24 : meh. I didn't care much for this bread. I have never liked panettone (the store-bought variety); I find it dry and blah. I was hoping that homemade will be better but my taste buds can't be wrong, this panettone like the ones from the stores is dry as bone and not tasty at all. Good thing I only made half a recipe.

IMHO this bread recipe needs MORE sugar and eggs. I prefer fruity breads moist and sweet and rich. I didn't want to waste all the candied peels, citron, dried fruits, almonds, and liqueur so I made it into bread pudding with lots of sugar, milk, eggs, and melted butter.

Panettone

Rating:
flavor 1
texture 1
visual appeal 3
ease of preparation 3
performance 4
worth 0
Total: 12
Average: 2

October 17, 2009

Strawberry Flan

Labels: , ,


Lasang Pinoy Sundays is a weekly gallery of food photography is hosted by SpiCes. The Iron Chef inspired theme for this week is Strawberries.

If you like flan and strawberries, here is an easy and delicious recipe.

Strawberry Flan
1 cup sugar for caramel
1 pint strawberries, hulled and washed
½ cup sugar, more or less to taste
6 eggs
1 can sweetened condensed milk
fanned strawberries for garnish, optional
  • Caramelize the 1 cup sugar and pour into the bottom of molds or ramekins. Set aside.
  • Preheat oven to 325°F.
  • Place the strawberries, sugar, eggs, and condensed milk in a blender and blend until strawberries are minced and all ingredients are mixed thoroughly. Pour the strawberry mixture into the prepared ramekins. Cover each ramekin with aluminum foil. Bake in a bain marie for 1 hour. Refrigerate overnight before unmolding.
  • Garnish flans with fanned whole strawberries if preferred.

October 14, 2009

Pane Siciliano BBAC#23

Labels: ,

Pane Siciliano

Pane Siciliano is tasty and has a fantastic aroma coming out of the oven. Its slightly sweet soft yet chewy crumb is open with irregular large and medium holes similar to French bread. The golden brown crust is just thin enough to get a good crunch when toasted. I like it a lot.

Although this is a 3-day bread, it's very easy to make as most of the time spent is for fermention/refrigeration. I shaped a third of the dough into the S pictured in the book and the rest I plopped into a loaf pan. After an overnight stay in the refrigerator, they were made to rest for half an hour before baking and had good oven spring. The only thing I didn't like is the sesame seed topping. I love sesame seeds, they add a wonderful flavor to this bread but they fly all over the kitchen when slicing and more than half of the seeds just go to waste. This bread is a keeper and I won't mind baking it again, perhaps I'll use a bit of sourdough starter next time and shape them into baguettes.

So far, 3 Italian breads are in my favorites list, including this one. The next two recipes are also Italian, Panettone which I occasionally bought a long time ago during the Christmas season, and Pizza Napoletana. Will they become favorites too? Stay tuned.;-)

Pane Siciliano
Pane Siciliano
a bit "plump-in-the-middle" S bread

Rating:
flavor 5
texture 5
visual appeal 5
ease of preparation 5
performance 5
worth 5
Total: 30
Average: 5

October 11, 2009

Maja Blanca

Labels: , , , , , ,

Maja Blanca

Maja Blanca is the Philippine version of white pudding made of cornstarch, milk, sugar, and vanilla extract. Maybe I am biased but IMHO our white pudding tastes way better because it has coconut milk and sweet corn kernels. I'm loving the recipe from KULINARYA guidebook which uses buco (young coconut) water and powdered milk and served with strips of buco meat on top. Really delicious!

Maja Blanca
adapted from KULINARYA guidebook
1 cup thick coconut cream
350 ml buco water
2 ears of sweet corn
2 tablespoons water
2 cups coconut milk
½ cup powdered milk
¾ cup sugar
½ cup cornstarch mixed with ½ cup water
buco meat, cut into strips
  • In a small skillet, heat the thick coconut cream over medium heat. When it starts to boil, lower the heat and continue cooking, uncovered, for 30 minutes. The milk should separate into oil and solid curd (latik). Remove the latik and set aside.
  • Cut the corn and scrape the cob on a large glass bowl. Add 2 tablespoons water, cover with plastic wrap and microwave for 1½ minutes.
  • In a medium non-stick saucepan, mix together the buco water, coconut milk, powdered milk, sugar, cornstarch mixture, and corn. Bring to a boil then lower heat. Simmer, uncovered, over low heat for 15 minutes, stirring constantly. Turn off heat when mixture thickens.
  • Transfer into individual bowls or a serving dish. Allow to cool and set. Top each serving with buco strips and latik.
Maja Blanca
coconut overload maja blanca

Peter Reinhart's Artisan Breads Every Day

Labels: ,

Chocolate Babka
chocolate babka that everybody will love

Good news! PETER REINHART'S ARTISAN BREADS EVERY DAY will be published October 27, 2009 and is now available to pre-order at amazon. If anybody is interested in attending one of his classes or events here is the link to his blog.

October 10, 2009

Prawn Sinigang

Labels: , , , ,


It's definitely fall already. The past few days have been cold and windy that I started bringing my plants inside the house. First to come in are the calamansi tree which has hundreds of tiny fruits growing right now, and the Spanish pimiento which I want to try to continue growing indoors. We've had several consecutive 40°F nights and my tomato plants are now starting to die. The plants still have plenty of unripe fruits, some I already made into green tomato jam which is yummy, btw.

Thinking of ways to use the green tomatoes aside from frying them, sinigang (soup) came to mind. Yes, since green tomatoes are a little bit more acidic than the ripe ones, they are definitely perfect as additional souring agent for sinigang. I used a packet of frozen young tamarind leaves and together with some vegetables from my garden I made prawn sinigang, very yummy.

homegrown vegetables: tomatoes, sweet and hot peppers, sitaw

Prawn Sinigang
4 cups rice water or water
souring agent such as fresh tamarind, young tamarind leaves, or kamias
4 large ripe tomatoes, cut into wedges
4 green tomatoes, cut into wedges
yardlong beans, cut into 1½-inch pieces
2 small Asian eggplants, sliced
1 cup edamame or lima beans
2 green medium-hot peppers (siling haba)
2 teaspoons sea salt or to taste
½ pound prawns
  • Place water and souring agent in a medium saucepan. Bring to a boil, turn heat down to medium, cover, and let boil for 10 minutes. Add the rest of the ingredients except prawns. Simmer, covered, for 3 to 5 minutes or until eggplants are soft.
  • Add the prawns and cook uncovered until they turn pink or red and completely cooked. Transfer into a serving container and serve immediately with steamed rice and fish sauce.

October 8, 2009

Me Want Cookie!

Labels: ,


It's been a looong time, probably 2 years, since I last had chocolate chip cookies. I haven't baked them because there are no longer small children in my house to appreciate these treats. I'm also too busy baking other goodies like meringue, macarons, and silvanas, and tons of bread.

Last week, I suddenly had a craving for chocolate chip cookies after reading Snickers Bar Chocolate Chip cookies at Joelen's blog. I didn't have Snickers candy bars but I did have toffee brickle chips and peanut chips. I adapted the recipes on the packages adding chocolate chips in both doughs. Both cookies are very good and will surely bring out your inner Cookie Monster.

Toffee Brickles And Milk Chocolate Chip Cookies


1 stick butter, softened
6 tablespoons sugar
6 tablespoons dark brown sugar
½ teaspoon vanilla extract
1 egg
1¼ cups all-purpose flour
¼ teaspoon baking powder
¼ teaspoon salt
¼ teaspoon cream of tartar
¾ cup toffee brickle chips
½ cup milk chocolate chips
  • Preheat oven to 350° F.
  • In a stand mixer with the paddle attachment, beat the butter and sugars on medium speed until light and fluffy. Add the egg and vanilla extract and beat until fully incorporated.
  • Stir together flour, baking soda, salt, and cream of tartar. With mixer on low, slowly add the flour mixture. Stir until just combined. Stir in both chips.
  • Using a small ice cream scoop, drop dough on parchment lined cookie sheets 1½ inches apart. Bake for 10 to 12 minutes or until light brown.
  • Cool on wire racks for 5 minutes. Transfer cookies on a flat surface or on wire racks and let cool completely. Store in an airtight jar.
Chewy Chocolate And Peanut Chip Cookies


1 stick plus 2 tablespoons butter, softened
1 cup sugar
1 egg
½ teaspoon vanilla extract
1 cup all-purpose flour
1/3 cup Dutch processed cocoa powder
1 teaspoon baking soda
½ teaspoon salt
1 cup peanut chips
½ cup semi-sweet chocolate chips
  • Preheat oven to 350° F.
  • Sift together the flour, cocoa, baking soda, and salt, set aside.
  • In a stand mixer with paddle attachment, beat butter and sugar until light and fluffy. Add the egg and vanilla extract and beat until fully incorporated. With the mixer on low, slowly add the flour mixture until just combined. Stir in the peanut and chocolate chips.
  • Using a small ice cream scoop, drop dough on 2 parchment lined cookie sheets 2 inches apart. Bake for 15 to 20 minutes. Cool on wire racks for 5 minutes. Transfer cookies on a flat surface or wire rack and let cool completely. Store in an airtight jar.

October 6, 2009

Pain de Campagne: BBAC #22

Labels: ,

Pain de Campagne: Couronne

I had so much high hopes for The Bread Baker's Apprentice Challenge # 22: Pain de Campagne but wasn't too thrilled with the result. It is not as tasty as Pain a l'Ancienne. The tight crumb is soft-ish although chewy, which is good. The book doesn't have any photo of the crumb so I can't really tell if it is supposed to be open or tight. I don't really care because I won't be baking this bread anytime soon. The flavor is so-so and there's nothing to rave and write about it. I decided to substitute photos for a lengthy write-up instead.

The only thing I enjoyed the most in making this bread is the shaping. The couronne Bordelaise looks so pretty but the book does not have the instructions which I found here. It's really fun to make and you don't really need a lined banneton to be able to shape it. A 10-inch pie plate or skillet and a smooth kitchen towel will do the job.

Improvised Basket For Couronne
I improvised a couronne basket by taping a small plastic container in the middle of a wicker banneton with removable liner

Lined Proofing Basket
the lining was dusted with lots of flour before laying on top of basket and plastic container

Pain de Campagne
proofing

Pain de Campagne
proofed dough inverted on a piece of parchment and ready for baking

Pain de Campagne: Couronne
the bread up close

Rating:
flavor 3
texture 3
visual appeal 4
ease of preparation 5
performance 3
worth 2
Total: 20
Average: 3.3

October 4, 2009

Vinegar And Chili Dipping Sauce

Labels: , , ,

chili infused vinegar is great with breakfast favorite longaniza patty topped with fried egg, or with grilled fish, meat, and chicken, and with fried lumpia taugeh
One of the most popular Filipino dipping sauces (sawsawan) is vinegar and birds-eye chili peppers. The dipping sauce enhances the flavor of any meal of the day including breakfast. It can be prepared fresh just before eating or already bottled, homemade or store-bought. Seasonings such as sea salt, fish extract, soy sauce, caramelized sugar syrup, or bagoong are added according to individual preference.

Chili In A Bottle (of Vinegar)
fresh red and green hot peppers
2 peeled whole garlic cloves
1-inch piece peeled and sliced ginger
palm vinegar (sukang paombong)
  • Fill a clean bottle half-full with chili, add the garlic and ginger. Fill with vinegar. Put the lid on and leave on the kitchen counter for 3 to 5 days for the flavors to meld. Pour a few tablespoons of the chili-infused vinegar in a dipping dish, add the preferred seasoning and a few sliced or crushed chili peppers from the bottle.

a weekly gallery of food photography, Filipino style, is hosted by SpiCes.


Design by New WP Themes | Bloggerized by Lasantha - Premiumbloggertemplates.com