Showing posts with label Peter Reinhart. Show all posts

August 14, 2014

Chocolate Swirl Brioche

Labels: , , ,


I baked these chocolate swirl rolls 8 years ago when I was still a newbie at both baking and blogging. I used a recipe for sweet bread but couldn't recall the chocolate filling ingredients. They were good but not as pillowy soft and satisfying like these rolls I made following Peter Reinhart's Poor Man's Brioche recipe. Just perfect. Totally addicting.

October 14, 2013

Italian 00 Flour Pizza

Labels: , , ,


When I joined a baking community a few years ago, a lot of bakers recommended Italian 00 flour which has a lower gluten content and is finer in texture than American all-purpose flour. They promised the pizzas and breads made with this flour would be more flavorful and fragrant. This type of flour though was not available at the time but King Arthur started selling a similar flour although some bakers said the pizzas they baked with it didn't have the same aroma and flavor. How can they tell with all the toppings on the pizza? Texture, maybe, and bite too but I'm not sure about the "fragrance" of the dough. I bought a small bag of imported Italian 00 flour from our local grocery store, Giant, so probably they will start appearing in most stores. One thing for sure with this flour, it makes perfect Neapolitan style pizza with its signature crispy tender crust. I have to bake another batch with minimal toppings using this flour and ordinary all-purpose flour for a taste and aroma test.

May 31, 2012

Brioche Ice Cream Sandwich

Labels: , , , , ,


It seems that an Italian version of our beloved Filipino favorite ice cream sandwich on soft monay bun has become very popular here in the US and in Italy. Their ice cream sandwich has gelato on brioche bun which makes the sweet snack super rich.

February 21, 2012

Dutch Crunched Vienna Bread Rolls

Labels: , , , ,


I bake our sandwich loaf bread regularly every week but lately I've been on a roll, bread roll, that is. The last two weeks I made 2 kinds of Filipino pandesal rolls and today I baked Vienna Bread rolls topped with Dutch crunch. Vienna bread is one of my favorite breads from Peter Reinhart's cookbook, The Bread Baker's Apprentice. The bread has thin crispy crust which I really love and has moist soft sweetish crumb. Because the dough uses a large amount of preferment the bread always comes out very flavorful.

September 28, 2011

Portuguese Sweet Bread

Labels: , , ,


One of my top 10 favorites from The Bread Baker's Apprentice Challenge was Portuguese Sweet Bread. The bread has tight soft sweet crumb and fragrant with lemon, orange, and

April 5, 2011

Pain à l'Ancienne Focaccia

Labels: , ,

Focaccia

My favorite focaccia recipe is Peter Reinhart's Pain à l'Ancienne Focaccia from
Artisan Breads Every Day. The recipe is simple to prepare; the dough is mixed the day before with minimal handling and baked the next day or whenever it's convenient. The focaccia has large irregular air pockets, is chewy and very flavorful. I prefer focaccia with very little topping, sometimes with just Parmesan cheese and sea salt.

Focaccia
topped with cherry tomato halves, Parmesan and Romano cheese, sea salt, and Italian parsley

Pain à l'Ancienne Focaccia
adapted from Artisan Breads Every Day by Peter Reinhart

4 ½ cups bread flour
2 ½ teaspoons kosher salt
1 ¼ teaspoon instant yeast
2 cups chilled water (55°F)
extra virgin olive oil
four 8-inch round pans lined with parchment paper
herb oil (extra virgin olive oil with herbs and spices of your choice)
toppings of your choice
  • In a standing mixer with paddle attachment, combine flour, salt, yeast, and water. Mix on lowest speed for 1 minute. Let the coarse wet dough rest for 5 minutes.
  • Drizzle 1 tablespoon olive oil on the dough, then resume mixing on medium-low for 1 minute. The dough should be smoother but will still be very soft, sticky, and wet. Use a wet spatula to transfer the dough to a lightly oiled container. Cover with plastic wrap and let the dough rest for 10 minutes.
  • Transfer the dough to a lightly oiled surface. With wet or oiled hands stretch out the dough from all sides, one at a time and fold over to the center. Flip the dough over and tuck it into a ball. The dough should be firmer but still very soft and fragile. Place the dough back into the bowl, cover with plastic, and leave at room temperature for 10 minutes. Repeat the stretch and fold process 3 more times.
  • Divide the dough into four 8-ounce pieces. Drizzle 1 tablespoon olive oil on the parchment-lined baking pans. Place one dough on each pan; drizzle 1 teaspoon or more olive oil on the dough ball. Using your fingertips, dimple the dough all over and spread it as much as it will allow. When the dough starts to spring back, cover the pans tightly with plastic wrap and refrigerate immediately. The dough will keep in the refrigerator for up to 4 days.
  • On baking day, remove pans from refrigerator. Drizzle all over with 1 teaspoon olive oil and dimple the surface until the dough has completely covered the pan. If the dough springs back, let it rest for 20 minutes and resume dimpling.
  • Cover with plastic wrap and let rise in turned-off oven with the light on, for 1 and a half hours.
  • Preheat oven to 500°F. Brush with herb oil, add toppings, and bake for 10 to 12 minutes or until the top is golden brown.

Focaccia
topped with rosemary, sauteed red onions, cured olives, and feta and Romano cheese

December 30, 2010

Breakfast Pizza

Labels: , , ,

Breakfast Pizza
with grated Romano cheese, Virginia country ham, and egg

Have you had cold leftover pizza for breakfast? If you do, then why not make individual pizza for breakfast. They're hot and delicious!

I used my favorite pizza dough from ARTISAN BREADS EVERY DAY by Peter Reinhart and topped them with country ham and eggs. You can top the pizza with sliced and cooked breakfast sausage or half-cooked strips of bacon. Put the egg/s in the middle surrounded by the meat to prevent the whites from running all over. Then bake at 500°F oven on a hot stone or on top of a preheated inverted cookie pan until dark brown on the edges, about 10 to 12 minutes.

I got a bit lazy to type the recipe but you can read it at Peter Reinhart's Pizza Quest website. It's a great website for pizza enthusiasts. It has Peter's stories, recipes, and videos on everything pizza. Enjoy!

December 1, 2010

Christmas Fruit Breads: Panettone and Stollen

Labels: , ,

Panettone

One of the breads in The Bread Baker's Apprentice Challenge that I didn't rate favorably was Panettone. It's only fair to give it another try, this time I followed the recipe from Artisan Breads Every Day also by Peter Reinhart. The cake/bread has sourdough starter which gives it a better texture and flavor, IMHO and I love it. This formula can also be used to make stollen and brioche but strangely, I didn't like the flavor of the stollen using this recipe. So I baked a batch of the BBA recipe which I knew a year ago was a keeper. The bread, or cake did not disappoint. It is delicious!

Panettone
adapted from Artisan Breads Every Day by Peter Reinhart

sourdough starter
1½ ounces mother starter, room temperature
6 ounces bread flour
3 ounces water, room temperature

dough
all of the starter
1 tablespoon honey
2 ounces lukewarm water
1 teaspoon instant yeast
4 egg yolks
1 tablespoon vanilla extract
3 tablespoons brandy, rum, or orange juice
7½ ounces bread flour
1¼ teaspoons kosher salt
3 tablespoons sugar
6 ounces unsalted butter, room temperature
2 cups candied fruit (citron, orange peels, lemon peels, golden raisins, cranberries)
  • Make the starter: Combine all the ingredients in a mixing bowl. With paddle attachment, mix on lowest speed for 1 minute, increase to medium and mix for 30 seconds. The starter should be dough-like, sticky but not tacky. Adjust with flour or water as needed. Transfer into the work surface and knead by hand for 30 seconds. Place on a lightly oiled container, cover with plastic wrap, and leave at room temperature for 8 hours. It will double in size.
  • Make the dough: Cut the starter into 10 pieces and put in the bowl of a standing mixer. In a small bowl, stir the honey into the warm water until dissolved then whisk in the instant yeast. Let the mixture sit for 1 minute then add it to the starter. Stir to soften the starter. In another bowl, whisk the egg yolks, vanilla extract, and brandy then add to the starter mixture and stir until evenly incorporated. Add the flour and salt. With the paddle attachment, mix on lowest speed for 2 minutes. The dough will be coarse, wet, and sticky but will hold together. Continue mixing on lowest speed, gradually adding the sugar. Increase the speed to medium-low and mix for 5 minutes, scraping down the sides of the bowl when needed. Switch to the dough hook and mix on medium-low, adding butter 1 tablespoon at a time, waiting until each addition is well incorporated before adding the next piece. Mix until the dough is shiny, soft, and very supple, this should take about 5 minutes. Mix on medium for 5 minutes more until you are able to pull out long, taffy-like strands of dough.
Panettone
the dough should be shiny almost silky, soft, and taffy-like
  • Shape the panettone: Add the fruits, mixing on lowest speed for 1 minute finishing by hand on the work surface. You may use dried fruits instead of candied citrus; or more, less, or none at all. Weigh out the desired size, form into balls, and place in oiled molds: 24 ounces for a full size panettone mold; for very small molds, about 3½ to 4 ounces. Each mold should be 1/3 full. Place the filled molds on a cookie sheet and cover with plastic wrap. Place the sheet inside a food-grade plastic bag and let rise for 12 hours at room temperature.
Panettone
  • Bake the panettone: Preheat the oven to 350°F, 325°F for large size. Bake small ones for 30 minutes and large ones for 45 minutes to 1 hour or until golden brown all over. Internal temperature should read 185°F. Cool the large panettone upside down on a rack.
Here is a preview of the marzipan-filled stollen. I'll publish the recipe in a separate post soon.:-)

Stollen

September 5, 2010

Twisty Baguettes

Labels: , ,

Twisted Baguettes
Twisted Baguette Crumb

David Lebovitz's blog never fails to inspire me. The latest is the USA-made hazelnut spread on holey twisted baguettes. The hazelnut spread looks really really yummy but the steep price is preventing me from getting a jar. I am more than happy and willing to make the twisted bread instead which is the more interesting of the two.

I have never heard of twisted baguettes which are supposed to be Swiss in origin. After reading about it here, I decided to use Peter Reinhart's pain à l'ancienne rustic bread recipe because I love its natural sweet flavor and ease of preparation. I altered the recipe a bit by substituting whole wheat flour for 5 ounces of the bread flour and increased the resting time between folds from 10 minutes to 30. The holey sweetish thin mini baguettes are superb and I love it with Nutella, of course, and with creamy spreadable just-made buttermilk cheese. I also made tiny ones, 6 inches in length, with a piece of bittersweet chocolate baton inside. It's very good but some of the chocolate oozed out and made a little bit of a mess.

What I love about the twisted shape is there is no need to score the loaves and they come out looking nice. I'll definitely make these again and will follow Jeffrey Hamelman's French Bread with Poolish recipe just to compare the flavors.

Twisty Baguettes
adapted from Peter Reinhart's ARTISAN BREADS EVERY DAY
Pain à l'Ancienne Rustic Bread recipe

15 ounces bread flour
5 ounces whole wheat flour
2½ teaspoons coarse kosher salt
1¼ teaspoons instant yeast
2 cups chilled water
  • Combine all the ingredients in a large mixing bowl and stir with a wooden spoon for 1 minute until well combined. The dough should be coarse and sticky. Let the dough rest for 5 minutes to fully hydrate the flour. Mix for 1 minute in machine or by hand using a wet spoon or wet hands. The dough should become smoother but will still be very soft, sticky, and wet. Transfer the dough to a lightly oiled container, cover with plastic wrap and let rest at room temperature for 30 minutes.
  • Transfer the dough to a lightly oiled surface. With wet hands, stretch and fold the dough: reach under the front end, stretch it out, and fold it back onto the top; stretch and fold the 3 remaining sides. Flip the dough and tuck into a ball and return to the container. Cover and repeat the stretch and fold 3 more times at 30 minute intervals. After the final stretch and fold, immediately cover with plastic wrap and refrigerate overnight or up to 4 days.
  • On baking day, remove the dough 1 hour before baking. Place a sheet pan on the bottom shelf of the oven and put the rack and stone in the lower middle shelf or wherever you want to position them. Preheat oven to 475°F for at least 45 minutes before baking.
  • Place the dough on a generously floured work surface and shape into a 12 x 8 inch rectangle. With a metal pastry scraper, cut off a slice 1½ inches wide and roll on the flour. Stretch to elongate and make it thinner, if desired. Twist the dough from end to end (or from middle to both ends) and carefully transfer on a sheet pan lined with parchment; if baking directly on a stone place the shaped baguette on a piece of parchment laid on top of a peel or inverted sheet pan.
  • Slide the baguettes on the stone or place the sheet pan in the oven. Pour ½ cup hot water on the bottom pan and bake for 12 to 18 minutes or until the crust is a rich brown. Cool baguettes on a wire rack for 15 minutes before slicing.
Baguettes in Oven

I just replaced my 13-year old gas oven. It was not working 100% for probably 6 months already. I noticed that the right side of the oven does not glow and it takes an hour or more to preheat to 350 degrees and can't maintain the heat while baking which is not good for baking cakes and breads. The cost to have it looked at by a professional is $200.00 plus more for parts and other services. I was tempted to open the oven floor and repair it myself but because this is a natural gas oven I was scared I might end up blowing up my house. The new oven, a Maytag, has more advanced features and preheats super fast. To test it for temperature accuracy, baking time, best rack position, etc I went nuts and baked today a loaf of white bread, chocolate Milo layer cake and cupcakes, and the mini baguettes. I'm quite happy with the oven. Which means more baked goods to write about.:p

August 6, 2010

Croissants

Labels: , ,

Croissants


I have decided to bake my way through Peter Reinhart's Artisan Breads Every Day at my own pace. There are a little over 30 recipes and I have baked maybe a third when I signed up to be a recipe tester 2 years ago. I will bake all the breads including the ones I already baked and will post the adapted versions as I go along. I highly recommend this baking book for beginner or with a little experience bakers and busy folks as the dough recipes are not very complicated [except for croissants] and are mixed the night before, kept in the refrigerator for 1 up to 4 days and the breads baked at your convenience. This is also not a no-knead bread book; there is minimal kneading with machine or hand, 2 to 3 minutes at the most, which I prefer to the no-knead method because a little kneading makes a huge difference in taste and texture.

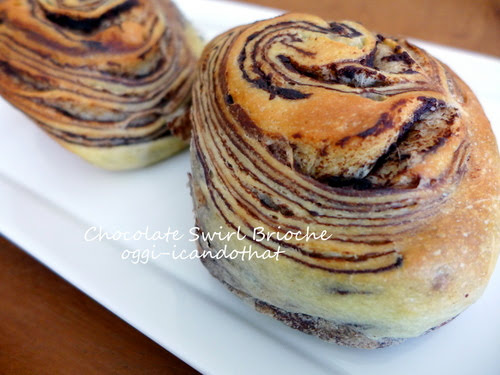
To start off this series is one of my top favorites from the book, Croissants. Making croissants is not an easy project. It takes 2 days and there are a number of steps to do but the end result is very rewarding: flaky buttery golden brown crust with delicious pillowy soft elastic layered crumb. After enjoying a few pieces of the croissants specially the ones with chocolate batons, you won't settle for anything less.

Croissants
adapted from ARTISAN BREADS EVERY DAY by Peter Reinhart

Croissant
the recipe makes croissants that have flaky buttery crust and soft pillowy somewhat elastic visibly layered crumb

dough
21 oz/595 gm/4 2/3 cups unbleached bread or all-purpose flour or a combination
0.4 oz/11 gm/2½ teaspoons kosher salt
2 oz/56.5 gm/¼ cup sugar
0.33 oz/9 gm/1 tablespoon instant yeast
7 oz/198 gm/¾ cup + 2 tablespoons cold whole milk
8 oz/227 gm/1 cup cool water
1 oz/28.5 gm/2 tablespoons soft unsalted butter
extra flour for dusting

butter block
12 oz/340 gm/1½ cups cold unsalted butter
0.57 oz/16 gm/2 tablespoons unbleached all-purpose flour

tools
standing mixer
plastic dough scraper
metal pastry scraper
rolling pin

optional ingredients
1 egg for egg wash
3-inch chocolate batons for chocolate croissants
  • Make the dough: With the paddle attachment, whisk together the flour, salt, sugar, and yeast in the bowl of a standing mixer. Add in the milk, water, and butter and mix on the lowest speed for 1 minute. The dough will look coarse, wet, and shaggy. Adjust with more flour or water if necessary. Continue mixing on the lowest speed for another 30 seconds, then increase the speed to medium-high for 15 seconds until the dough begins to smooth out. It will be very soft, supple, and sticky, but not batterlike. Add more flour or water as needed and mix until the dough has formed. It should be soft and pliable and somewhat sticky. Transfer the dough to the kitchen counter dusted with flour and with floured hands, form it into a ball. Place the dough seams side down in a lightly oiled container, cover with plastic film and lid, and immediately refrigerate overnight or for up to 2 days.
  • Prepare the butter block: Cut the cold butter into ½ inch slices and place in the bowl of a standing mixer. Sprinkle the flour and beat on low with the paddle attachment until combined, scraping down the sides as needed. The butter should still be cold. Using a plastic scraper, transfer the butter mixture onto a large piece of plastic wrap and shape into a 6-inch square.
  • Incorporate the butter block into the dough: Have a container of flour nearby. Lightly dust the kitchen counter with flour. Remove the dough from the refrigerator and roll into a 12½ inch by 6½ inch rectangle, about ½-inch thick. Place the butter block on one side of the dough, fold the other half of the dough to completely cover the butter and pinch on all sides to seal in the butter block. You now have three layers: dough, butter, dough.
  • Laminate the dough: With the metal scraper, lift the dough, one side at a time, and toss more flour underneath it. Lightly tap the dough with a rolling pin and working from the center out and then on all four sides, gently roll the dough into a 9 x 16-inch rectangle, dusting under and on top of the dough as needed, always using a metal scraper to prevent tearing and to keep the corners squared. Fold the dough as if folding a letter: fold the right one-third of the dough over to the left, making sure the top and bottom are squared-off and are perfectly aligned with the bottom dough. Fold the left one-third dough to the right the same way. Use the rolling pin to press out any air pockets, then lay it down on a sheet pan lined with the plastic wrap you used for the butter block. Cover loosely with another piece of plastic wrap and refrigerate for 30 minutes. Dust the kitchen counter with flour. Transfer the dough back on the counter with the open seam facing away from and the closed side facing you, and gently roll and fold it as before. Return to the plastic-lined pan, cover, and refrigerate for 30 minutes. Repeat this procedure one more time. You have now completed three turns and created 81 layers of dough and butter.
  • Roll and shape: Transfer the dough back to the flour-dusted counter and gently roll out, from the center to the corners, then out to the sides, until the dough is under ¼ inch thick, about 28 inches wide and 9 inches long, lifting the dough with the metal scraper and dusting the counter underneath with flour to prevent it from sticking and tearing. Remember to always keep the corners neatly squared-off.
  • To make croissants: Using a ruler, make a small notch with the metal scraper at 4-inch intervals along the bottom edge of the dough. Repeat this along the edge of the top of the dough but mark the first at 2 inches from the left and continue measuring at 4-inch intervals from that point. Using a pizza cutter or the metal scraper, cut a line from the left corner of the bottom dough to the first notch of the top dough, then simply connect the marks to cut off the dough triangles. When all the pieces are cut and separated, cut a 1-inch notch into the bottom center of the triangle base. Spread the bottom as wide as the notch will allow to create wing-like flaps. Begin rolling up the dough, gently pulling the top point (nose) as you roll, trying not to squeeze it. It should form in either 5 or 7 "steps". Place the shaped pieces on parchment-lined sheet pans 2 inches apart, with the nose positioned underneath so that it is anchored. Give the end flaps a slight curve and facing in the same direction as the nose is pointing. Cover loosely with plastic wrap and let rise at room temperature for 2½ to 3 hours or until the croissants look airy and feel hollow. About 20 minutes before baking, preheat oven to 450°F/232°C. Apply egg wash if desired. Place the pans in the oven and immediately lower the temperature to 375°F/191°C and bake for 15 to 20 minutes, rotating pans halfway through, or until a rich golden brown all over. Allow to cool for 40 minutes before serving.
  • Chocolate Croissants: Use half or the full recipe. Cut the rolled dough into 3½ inch x 6 inch rectangles. Place 2 batons on one short side, roll up, and place on the parchment-lined pans, seam side down, 2 inches apart. Bake as above.

Chocolate Croissant
chocolate croissants

June 24, 2010

Food Friday: Pizza

Labels: , ,

Pizza Napoletana
barbecue sauce, roasted garlic, flaked Thai chicken, chives, cilantro, and mozzarella


Pizza is one food that nobody doesn't like. It's probably the perfect food with the right toppings, of course. Having made pizzas from half a dozen dough recipes, including Neo-Neapolitan from Peter Reinhart's new book ARTISAN BREADS EVERY DAY, I am sticking with the one I think is the best for my preference in pizza dough, Peter Reinhart's Pizza Napoletana from the The Bread Baker's Apprentice. For this pizza dough recipe, there's a choice of high gluten flour, unbleached bread flour, and all-purpose. The high gluten and bread flours need a quarter cup of olive oil to tenderize the dough. I have always used unbleached all-purpose flour for this recipe and have gotten excellent results each and every time.

This is an unusual dough because it uses ice cold water and made to rest in the refrigerator overnight (or for up to 4 days). The dough is a bit slack but easy enough to handle. The finished pizza has all the qualities I love: thin crisp but tender chewy sweetish creamy crust with puffy crispy chewy edges. This pizza dough does not need a lot of toppings and I usually add homemade tomato paste, 2 kinds of cheeses, and small pieces of vegetables such as roasted peppers or baby artichokes. Peter divides the dough into small 6 ounce balls for easier handling. I make mine 8 ounces each and stretch them into 12-inch rounds.

For pizza and other rustic breads I use 6-inch unglazed quarry tiles that I purchased from Home Depot for 33 cents each. The tiles get really hot and seem to do a great job of searing the bottom better than a pizza stone. They are also conveniently mobile and can easily be moved from oven to the outdoor grill.

Peter's notes:
The dough does not need "lip", but one inevitably occurs because the edge is usually thicker than the center and it doesn't have any sauce to hold it down. Do not try to build up the edges by crimping because you want it to bubble up on its own and create a light, airy crumb.

Neapolitan-style Pizza
adapted from The Bread Baker's Apprentice by Peter Reinhart
4½ cups [20.25 ounces] unbleached all purpose flour, chilled
1¾ teaspoons salt
1 teaspoon instant yeast
1¾ cups [14 ounces] ice cold water (40°F)
2 tablespoons olive oil
6 zipper freezer bags
  • Sift together the flour, salt, and instant yeast in a 4-quart bowl of a standing mixer with the paddle attachment. Stir in the water until all the flour is absorbed, and mix for about 5 minutes. Switch to the dough hook and mix on medium speed for up to 7 minutes. The dough should clear the sides of the bowl but stick to the bottom of the bowl. If the dough is too wet and doesn't come off the sides, sprinkle in some more flour just until it clears the sides. If it clears the bottom, dribble in a teaspoon or two of cold water. The finished dough will be springy, elastic, and sticky, not just tacky, and registers 50° to 55°F.
  • Sprinkle flour on a work surface. Using a metal scraper, cut the dough into 6 equal pieces. Sprinkle the dough with a little flour and form into balls. Place the oil in a bowl and roll each ball in the oil and place in separate bags. Place the bags in the refrigerator for up to 4 days, or place some in the freezer for up to 3 months (transfer the frozen doughs in the refrigerator one day before you plan to bake them).
  • On the day you plan to make the pizza, remove the desired amount of dough balls from the refrigerator.
  • Dust the work surface and your hands with flour. Gently press the dough into flat disks about ½ inch thick and 5 inches in diameter. Sprinkle the dough with flour and cover loosely with plastic wrap. Let rest for 2 hours.
  • At least 45 minutes before baking, place a baking stone or unglazed quarry tiles on the lowest rack of the oven and preheat the oven to the highest heat setting.
  • Place a large sheet of parchment on your peel or generously dust with semolina flour. Make the pizza one at a time. Dip your hands including the back and knuckles in flour and gently lift one piece of dough with the help of a pastry scraper. Very gently lay the dough across your fists and carefully stretch it by bouncing the dough in a circular motion, giving it a stretch with each bounce. If it begins to stick, lay it down on the floured surface and reflour your hands, then continue shaping. If you are brave enough, toss the dough up in the air.
  • When the dough is stretched out to your satisfaction, lay it on the paper-lined or semolina dusted peel. Lightly top it with your toppings and slide the pizza, including parchment, on the stone and close the door. The pizza should take about 5 to 8 minutes to bake. Remove from oven and transfer to a cutting board. Wait 3 minutes before slicing and serving to allow the cheese to set slightly.
These are from last year's BBA Challenge:

 Neapolitan-style Pizza
tomato sauce, capers, mozzarella, feta, and kesong puti (Filipino fresh white cheese)

Blueberry Pizza
dessert pizza topped with fresh blueberries and coarse raw sugar

March 27, 2010

Peter Reinhart's Biscuits

Labels: , ,


One of the enriched baking powder breads in Peter Reinhart's baking book Artisan Breads Every Day is biscuits which he calls The Best Biscuits Ever, and I agree with him. The recipe is so rich with a whole cup of heavy cream and half a cup of butter in less than 2 cups of flour. It's richer than any biscuits and scones I have ever baked. They are very flaky and truly delicious but if you are health conscious, buttermilk is a good substitute for the cream and will still be very yummy.

The Best Biscuits Ever
adapted from Artisan Bread Every Day by Peter Reinhart

½ cup unsalted butter
1¾ cups all-purpose flour, sifted (I used 2 cups)
1 tablespoon sugar
½ teaspoon kosher salt
extra all-purpose flour for dusting
1 cup very cold heavy cream mixed with 2 tablespoons lemon juice or cider vinegar
  • Leave the butter in the freezer for 30 minutes until firm. In a large bowl, mix the flour, sugar, and salt. Using the large holes of a grater, grate the butter directly onto the flour. Mix with a spoon or spatula and add the cream.


October 11, 2009

Peter Reinhart's Artisan Breads Every Day

Labels: ,

Chocolate Babka
chocolate babka that everybody will love

Good news! PETER REINHART'S ARTISAN BREADS EVERY DAY will be published October 27, 2009 and is now available to pre-order at amazon. If anybody is interested in attending one of his classes or events here is the link to his blog.

September 2, 2009

BBAC And The Washington Post

Labels: , ,

The Bread Bakers' Apprentice Challenge is one of the featured virtual baking/cooking clubs in this week's Food Section of The Washington Post. You can read the full article here written by one of us BBAC bakers, A Tiger In The Kitchen.

A photo collage of baked goodies from 8 BBAC bakers are included on the front page of the section, the shortened version here is from their website, and there are several larger beautiful photos of breads inside the pages.

The Bread Baker's Apprentice Challenge is created by Nicole of Pinch My Salt.


May 13, 2009

The Bread Baker's Apprentice Challenge: Anadama Bread

Labels: , ,

Anadama
crunchy and chewy, excellent with just butter or Meyer lemon curd


I joined a baking group, The Bread Baker's Apprentice Challenge created by Pinch My Salt. The group will attempt to bake all the recipes in Peter Reinhart's cookbook, from the first one to the last, arranged alphabetically. I have been a fan of Peter Reinhart after reading and baking several recipes from THE BREAD BAKER'S APPRENTICE and learned a ton from it. I recommend this book to anyone who is just starting to bake breads or has been baking and wants to learn some more. The recipes are easy to follow and there are a lot of pictures to guide the home baker. I love all the breads I made from this book and as a result I volunteered as a recipe tester for his new book Peter Reinhart's Artisan Breads Everyday to be published in the fall of 2009. I had a lot of fun baking and eating all the different breads I baked (and still baking) as a recipe tester specially the croissants and I'm eagerly anticipating the issue of his book. While waiting for it to come out, the BBA Challenge will keep me occupied and happily baking for the next 40+ weeks. Thanks to Pinch My Salt for this brilliant idea.

The challenge starts off this week with Anadama Bread which is in almost all of my baking books but somehow I have never tried making it, I'm not sure why. It's a shame because this bread turns out flavorful, chewy, and has a crunchy bite that I like. The bread is good by itself, toasted or untoasted, or with butter. I do believe soaking the cornmeal makes a big difference in its taste and texture. I'm surprised that I like this bread because I am not a big fan of molasses. The taste of the molasses, I used a light colored one, is subtle and does not overpower the overall flavor of this pleasantly sweetish bread. And the aroma in my kitchen while the bread was baking was just wonderful.

I followed the recipe as written although I halved it because I thought no one in my house will like it. The dough performed exactly as the book says. When I saw that the bread was rising taller than expected I got worried it will have large air pockets but thankfully the bread came out fine. My only regret is I did not bake the full recipe. I wouldn't mind baking Anadama bread again.

Anadama Bread
the bread had an oven spring of almost 1½ inches

Anadama Bread
I love its rich golden brown crust, very crisp and crunchy when toasted

Now, let's have some fun and rate the recipe/bread from 1 to 5, 5 being the highest:

flavor 4
texture 5
visual appeal 5
ease of preparation 5
performance 5
worth 4
Total: 28
Average: 4.66

 
Design by New WP Themes | Bloggerized by Lasantha - Premiumbloggertemplates.com